How to setup a DDNS client - Example 2 (No-IP)
Embark on a journey to set up your Dynamic DNS (DDNS) client using No-IP with our comprehensive guide. Starting with registration and hostname creation on the No-IP website, effortlessly progress through account confirmation and plan selection tailored to your needs. Follow clear instructions for downloading and installing the Dynamic Update Client (DUC) onto your system. Visual learners can benefit from accompanying video tutorials for each setup step. Ensure smooth operation by verifying your domain name using simple Command Prompt instructions. Empower yourself with the knowledge to manage your DDNS client effectively, ensuring consistent access to your services.
How to setup a DDNS client (Plain steps)
To setup a DDNS client
- Load the No-IP website
- Create a free hostname
- Sign up for an account
- Confirm your account
- Select No-IP account plan
- Download the Dynamic Update Client
- Install DUC
- Open the Dynamic Update Client and sign in
- Check the domain name
- Confirm that the Dynamic Update Client is running
- Open Command Prompt
- Verify that the IP address matches your current public IP
Setup a DDNS client (Video tutorial)
In this video you will see the process of how to setup a DDNS client. We will provide you all the essential steps you need to follow. Every steps is shown in the video, so it will not cause any problems to complete the process correctly. By the end of this, you will have the knowledge on how to setup a DDNS client, so you can use this knowledge in the future as well.
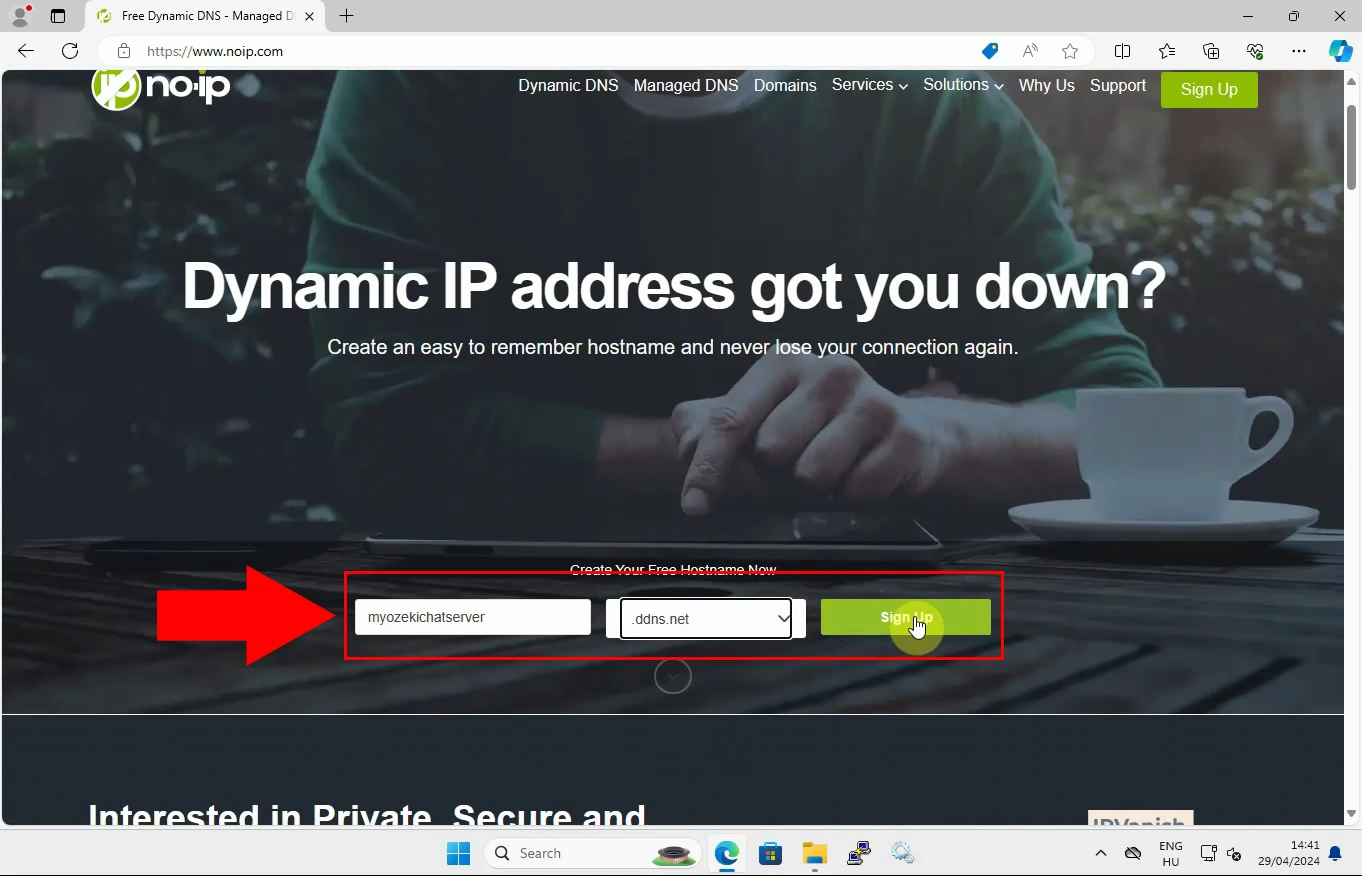
As the beginning of the process, load the No-IP website on your computer's browser. Create a free hostname by entering the neccessary infromation into the cells. You have to enter the hostname, then choose the "ddns.net" option from the drop-down list of variables. (Figure 1) After entering the required data, click on the "Sign Up" button to register.
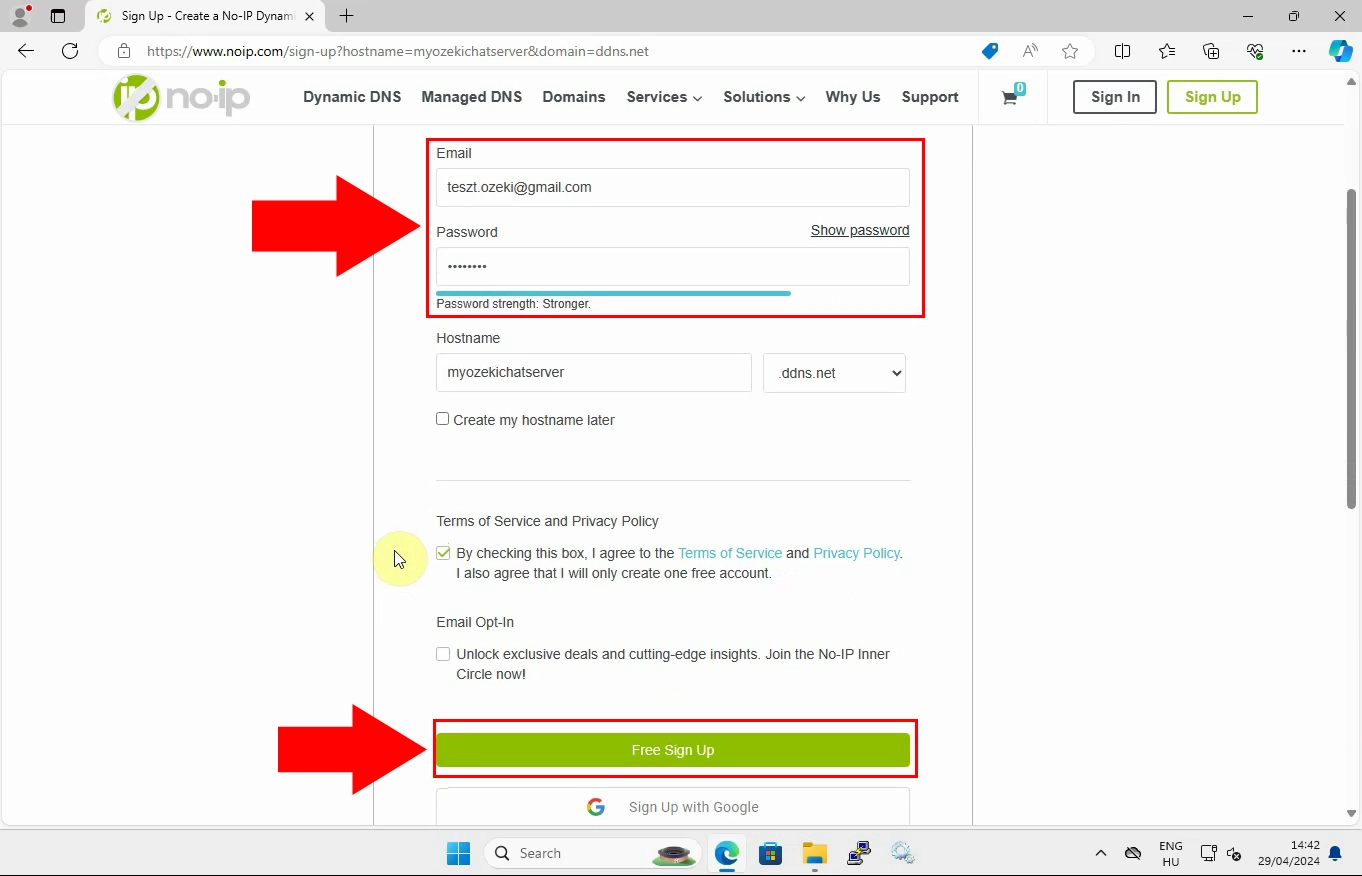
After creating the hostname, sign up by entering your email address and creating a password. Enter these information into the certain cells. (Figure 2) Agree on the terms and policies, by marking them with a tick. That is optional to subscribe for the newletter. Click on the "Free Sign Up" button, then confirm your account through the email sent by No-IP.
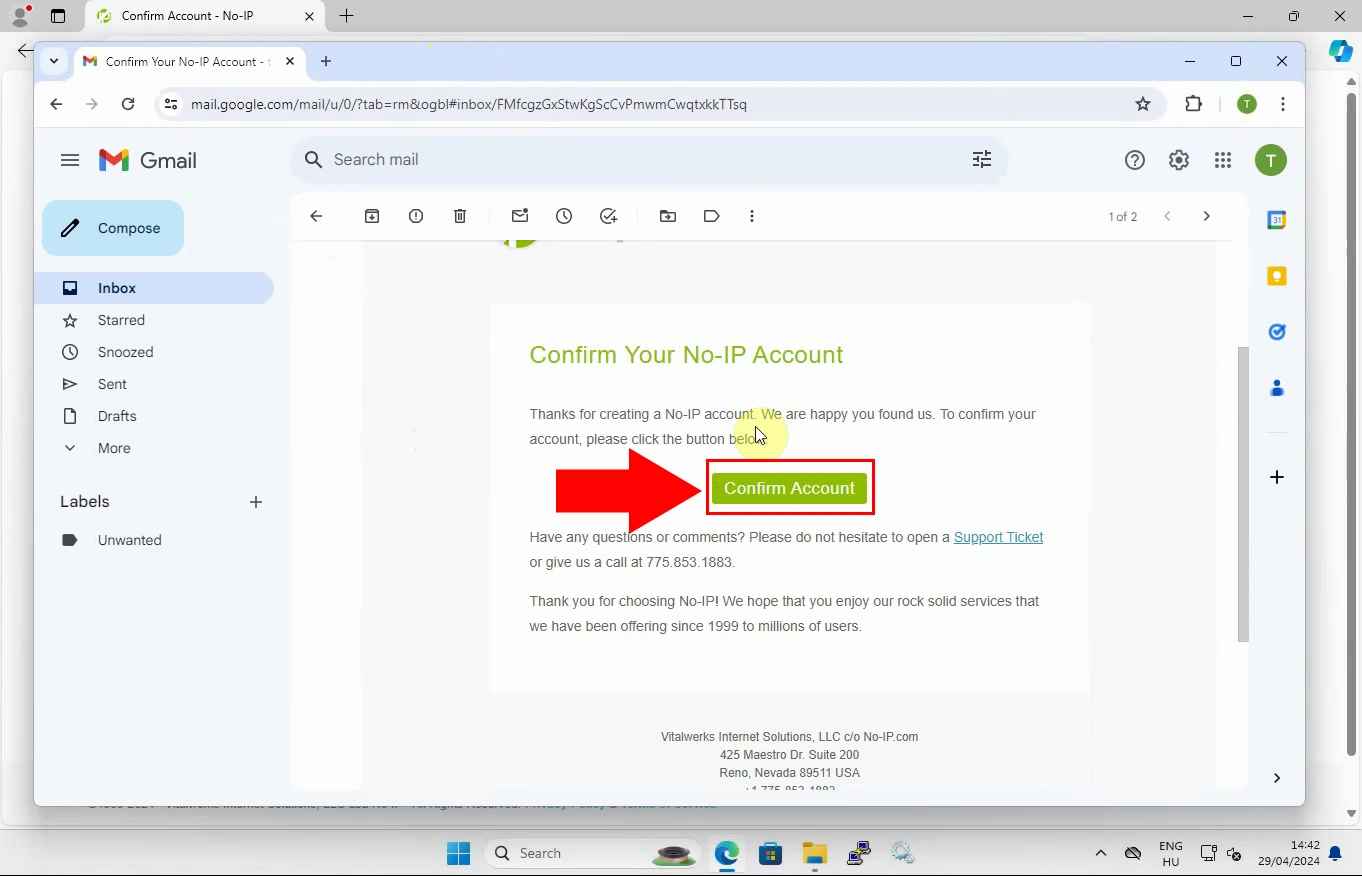
Load your email account of which you have registered on the NO-IP site. Open the email that you have received from them, then confirm your new NO-IP account. (Figure 3) By clicking on the confirmation link, your accoutn has been successfully activated. You can now start using your NO-IP account. If you do not see the confirmation email in your inbox, check your spam or junk folder.
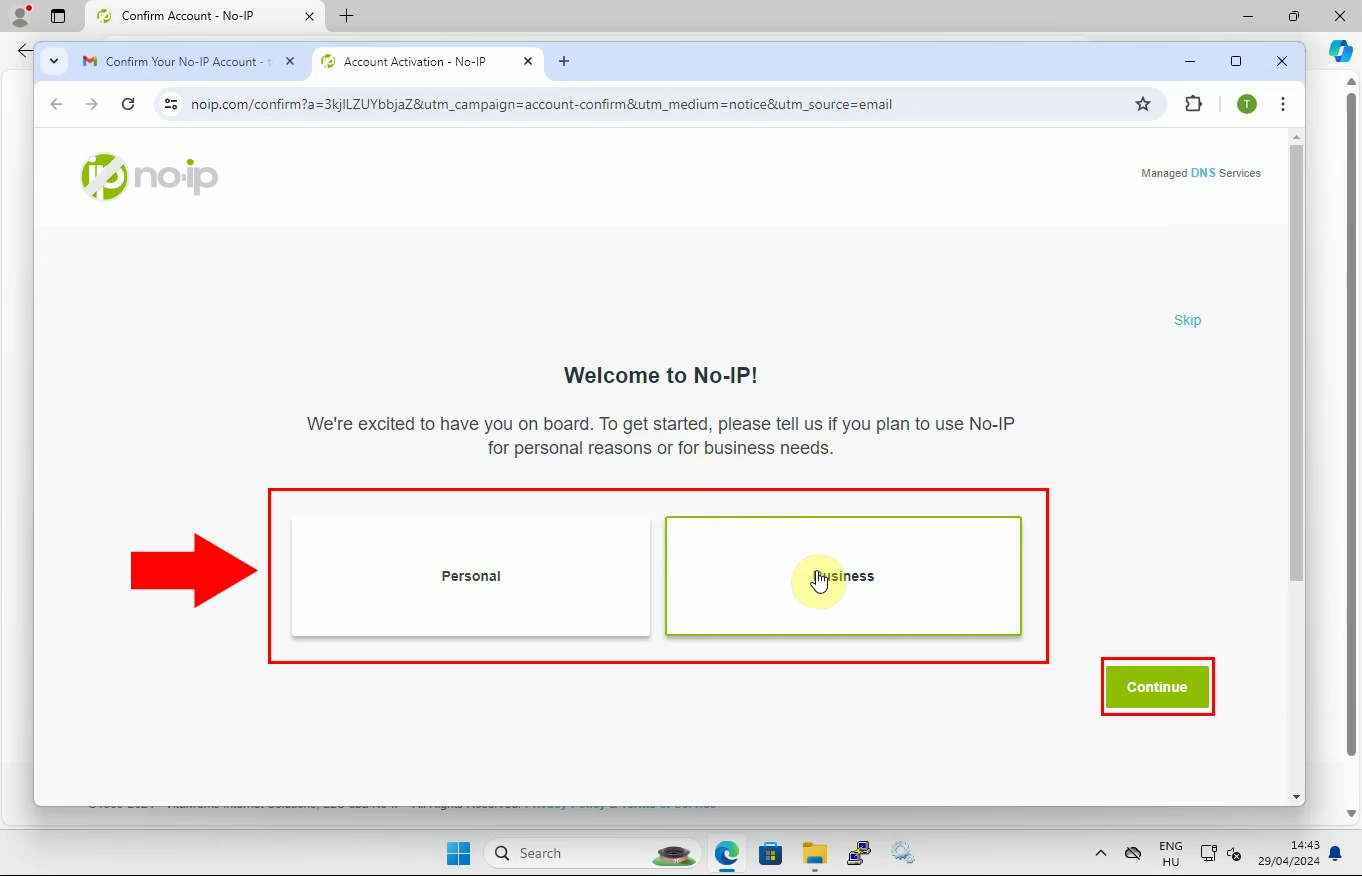
After logging in to your No-IP account, select a plan that best suits your needs. There are free and paid options available. You can choose from personal or professional use. Now, choose the Professional oprion, then click on the "Continue" button for further configuration steps to yuit you as the best. (Figure 4)
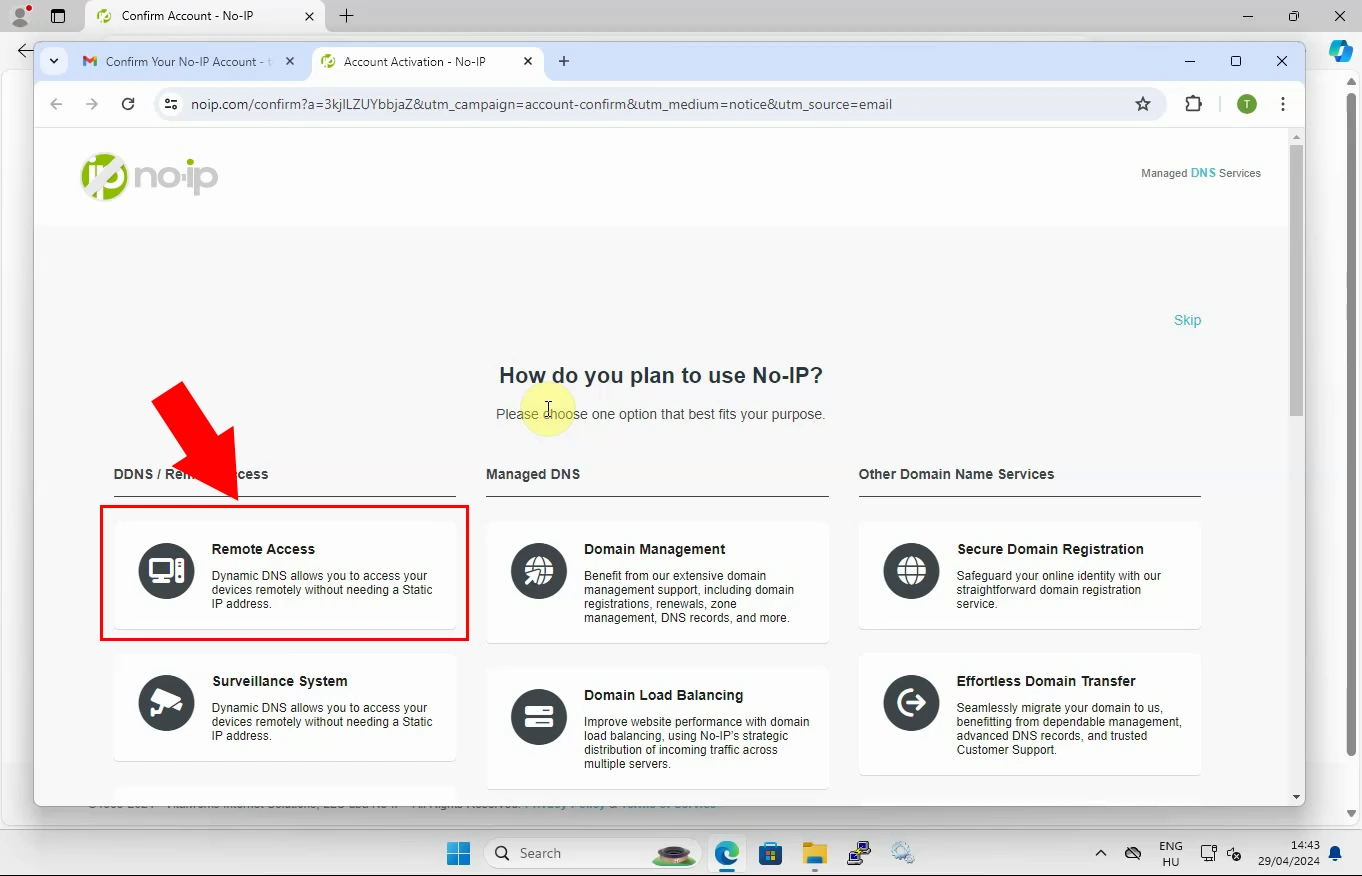
Now, you had navigated automatically to the purpose selection page. You will be presented with several options to select the purpose of your DDNS use. You have to select one, that suits you the best. Now, choose "Remote Access" that allows you to access your devices remotely without using a static IP address. (Figure 5)
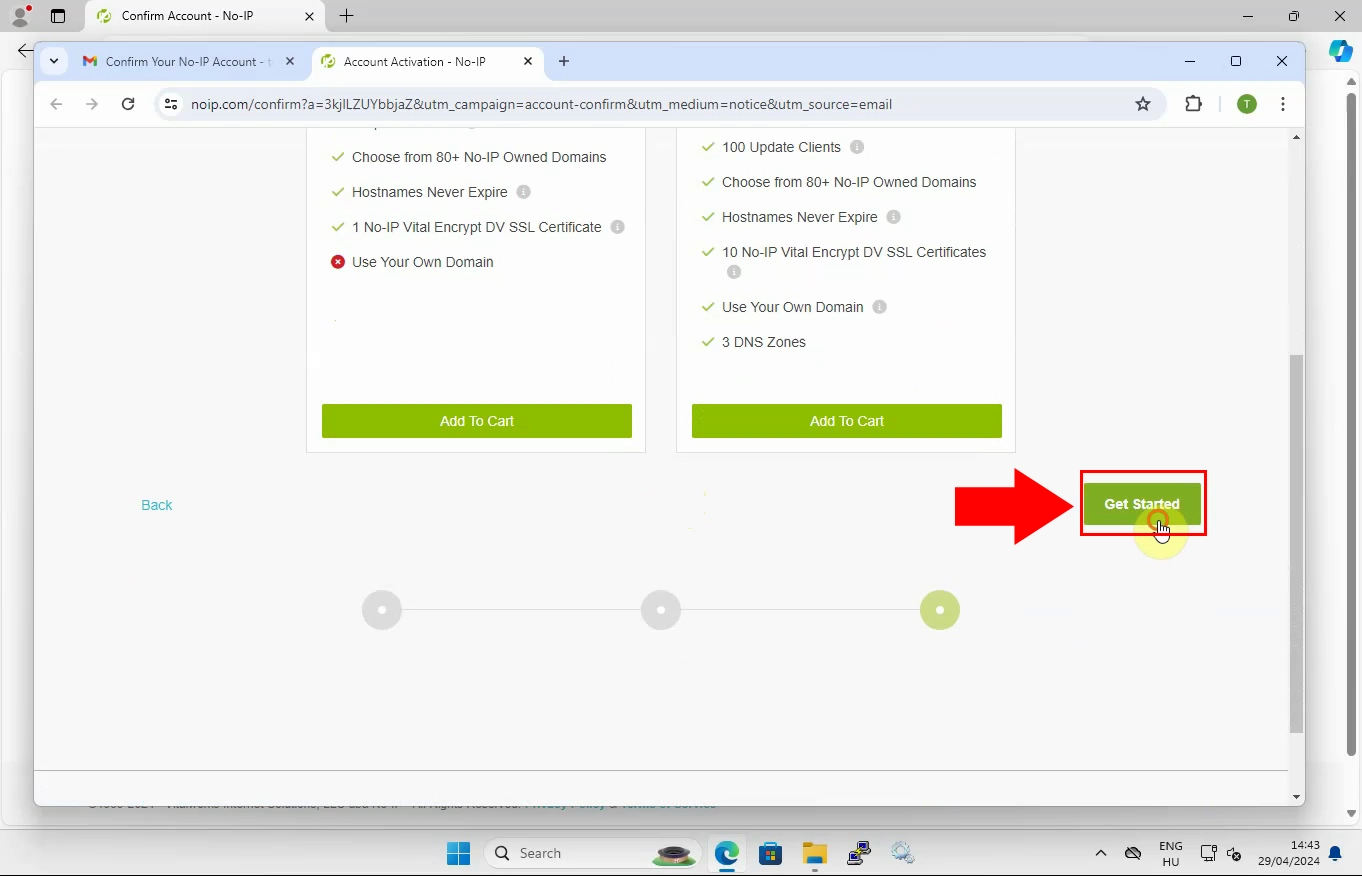
By continue the process, there will be offered paid verisons of the No-IP with extra, premium features. You do not need to click on them, only reach to the next part, by clicking on the "Get Started" button. (Figure 6) It will launch the free version of the No-IP services.
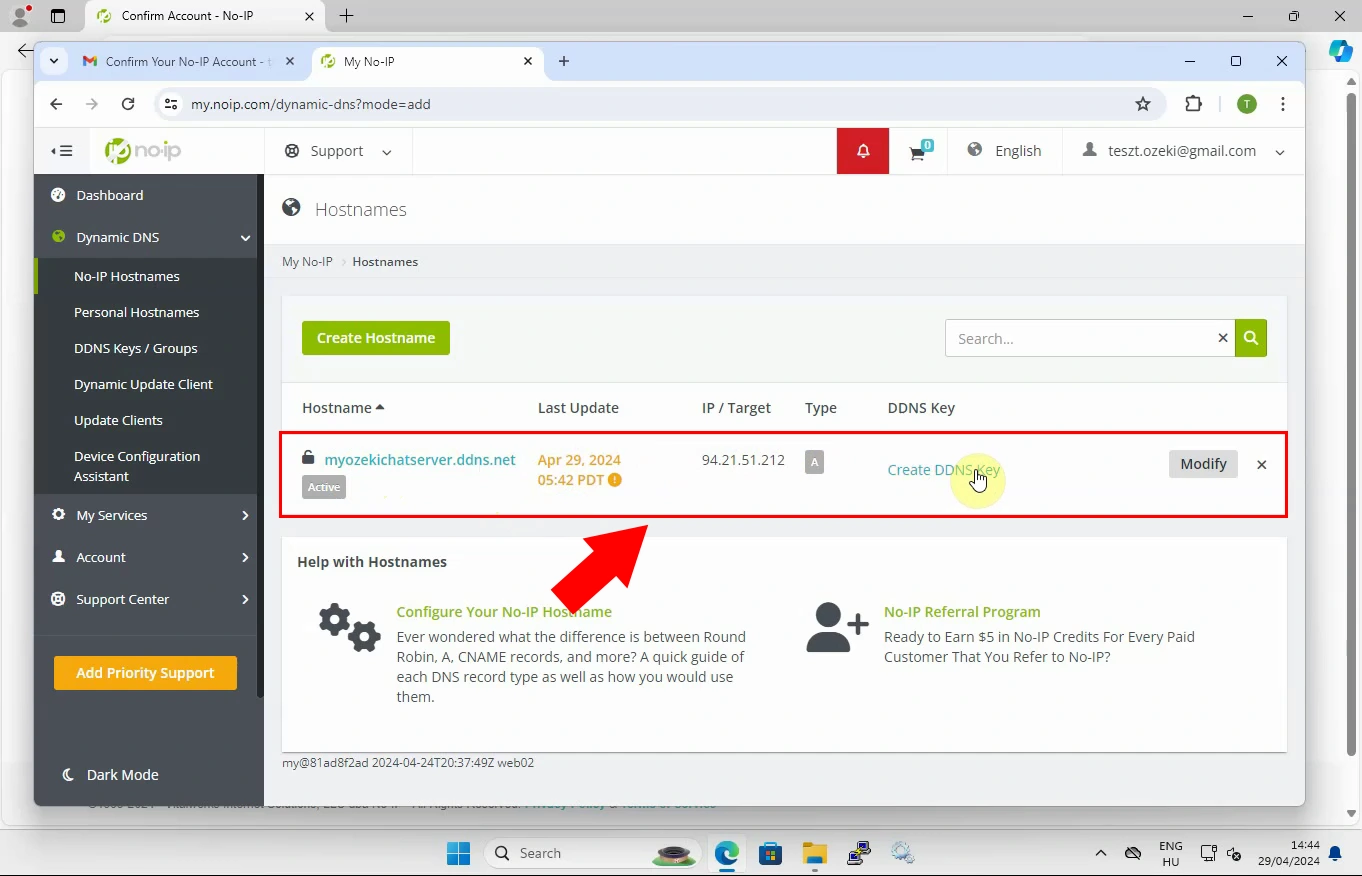
Getting started the service, a hostname configurator window will appear with your hostname and domain you have set up previously. Check the record type, and other configurations, then click on the "cancel" button. By clicking on the cancel button, will lead you back to the hostnames main page. There you can see that your hostname is already created. (Figure 7)
This video will be about running the No-IP Dynamic Update Client. We provide you detailed explanation of the process, so you can follow the steps easily. By following the instructions in this video, you will learn how to effectively run and manage the No-IP Dynamic Update Client, ensuring your domain name always points to your current IP address.
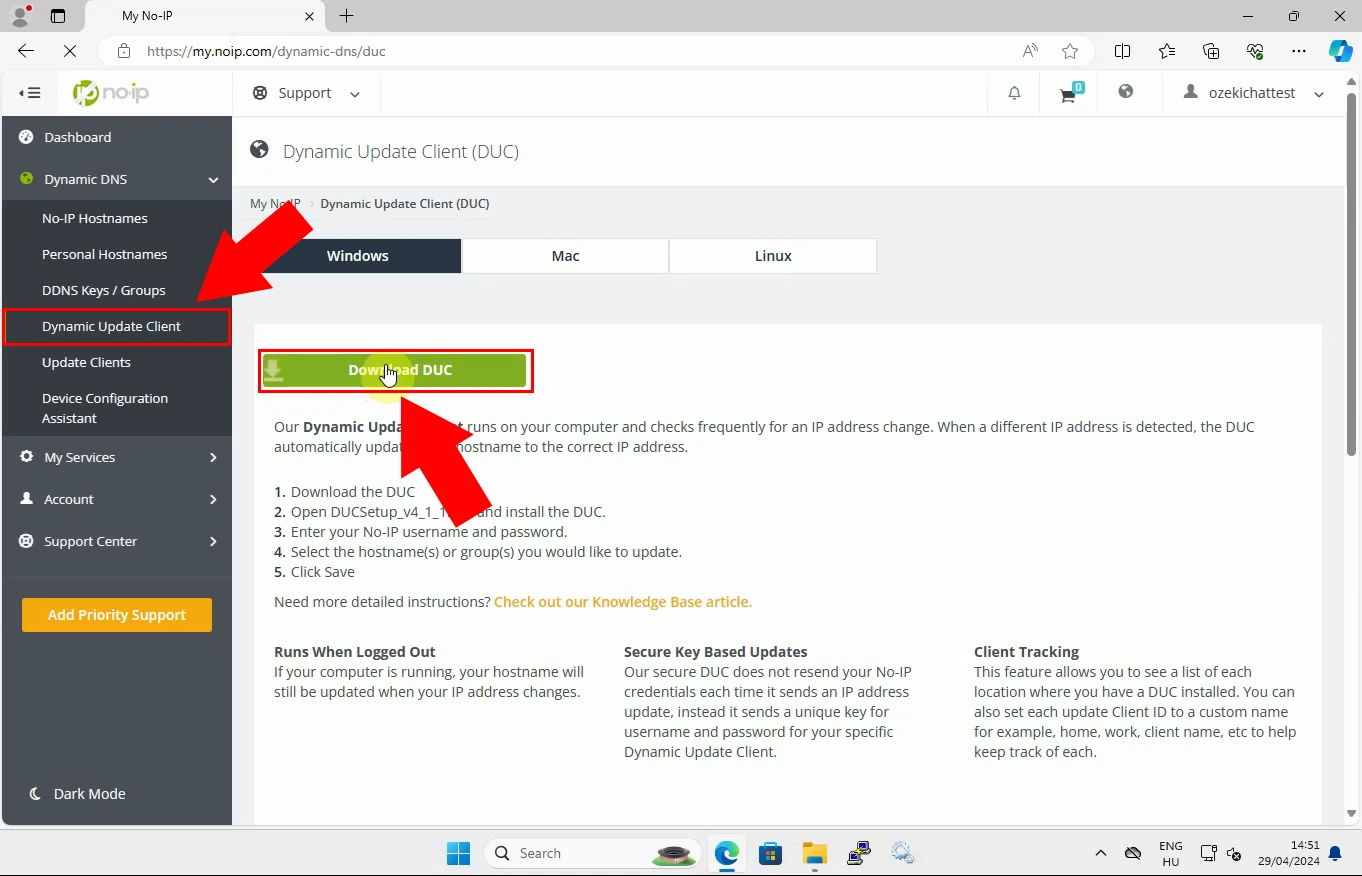
Open the Dynamic Update Client. Download the Dynamic Update Client application on your computer. To download click on the "Download DUC" button, highlighted in green. (Figure 8) This will start downloading the Dynamic Update Client installer file appropriate for your operating system.
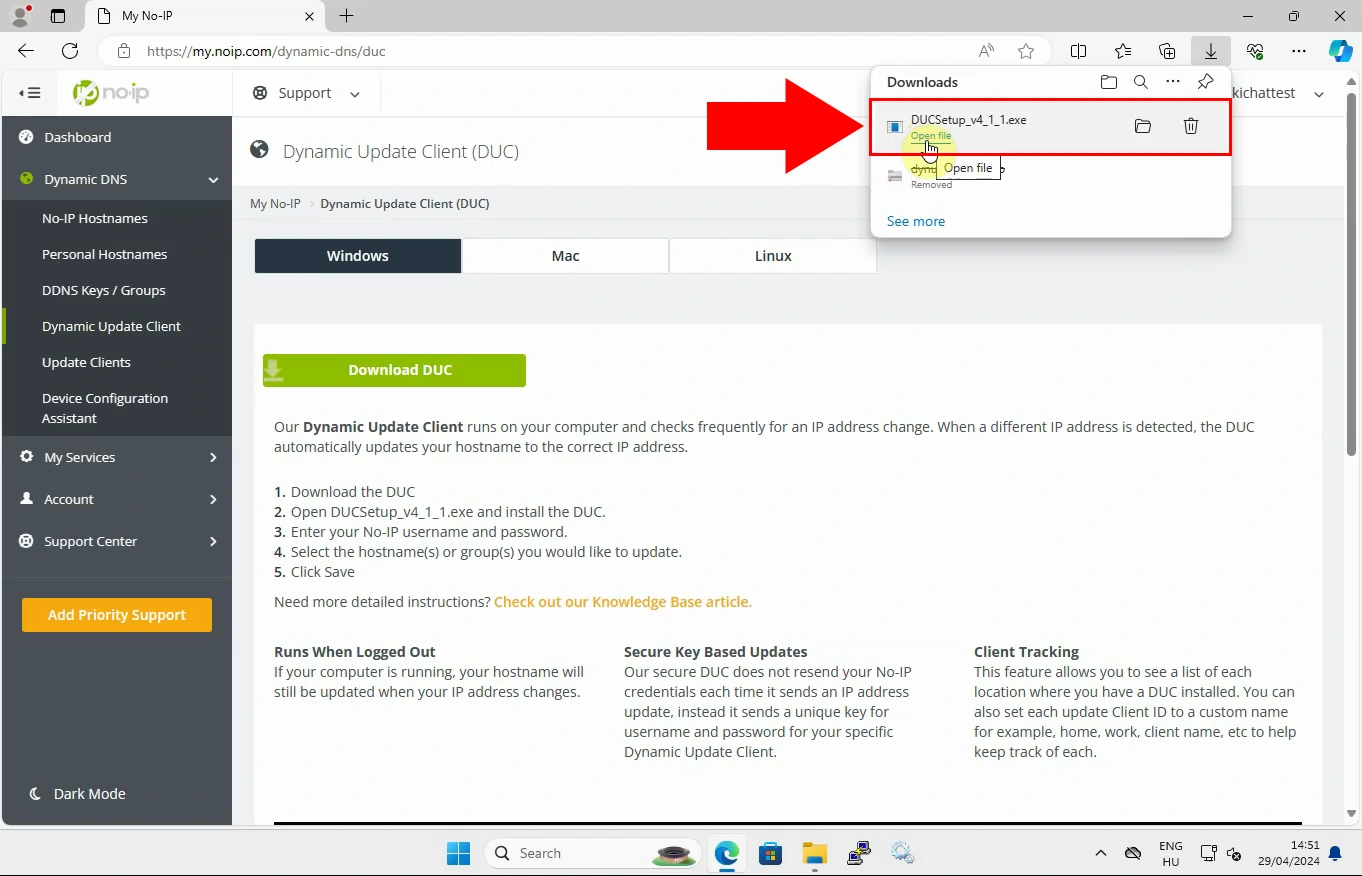
Install the DU Client. Once the download is complete, locate the installer file in your Downloads folder or wherever your browser saves downloaded files. Double-click on the installer file to start running. (Figure 9) Now, follow the instructions on the screen provided by the installer.
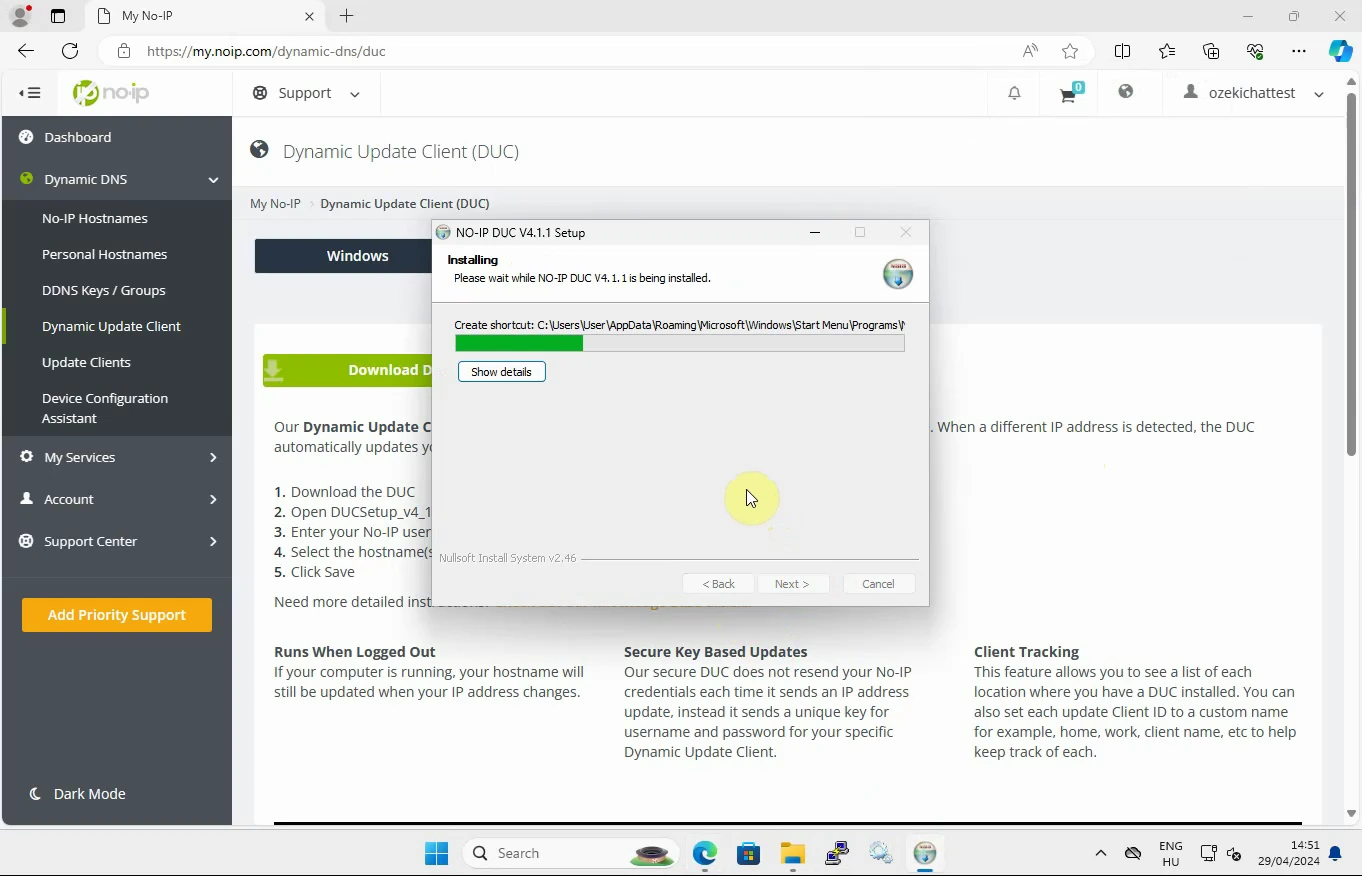
Monitor installation progress. The installer will copy the necessary files to your computer and configure the Dynamic Update Client. This process may take a few minutes. The progress bar will show the installation status percentage. (Figure 10)
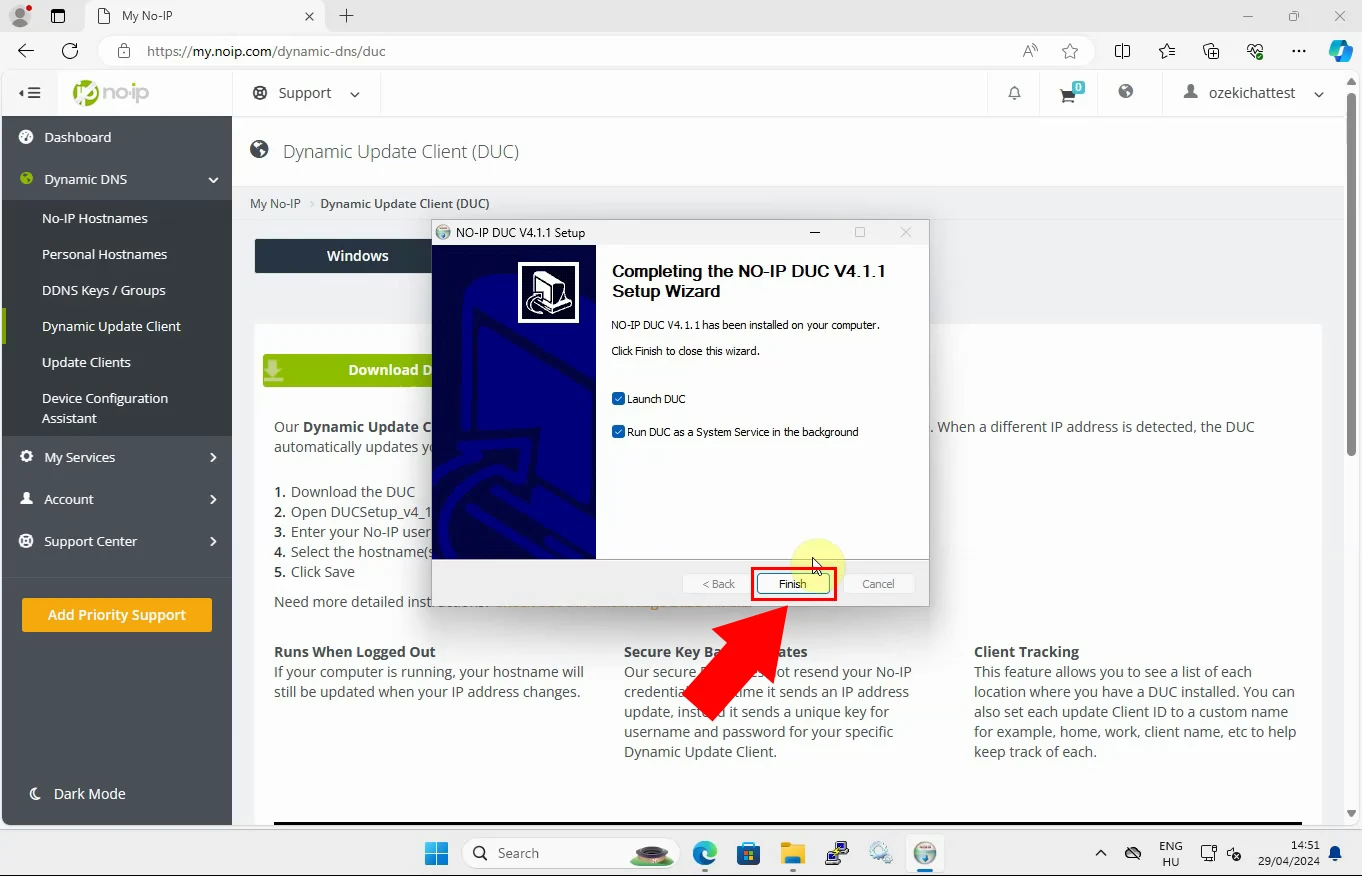
Once the installation is complete, a notification will appear indicating that the process has finished successfully. Close the installer by clicking on the "Finish" button. You have the option to launch the Dynamic Update Client immediately by checking a box before clicking on the "Finish" button. (Figure 11)
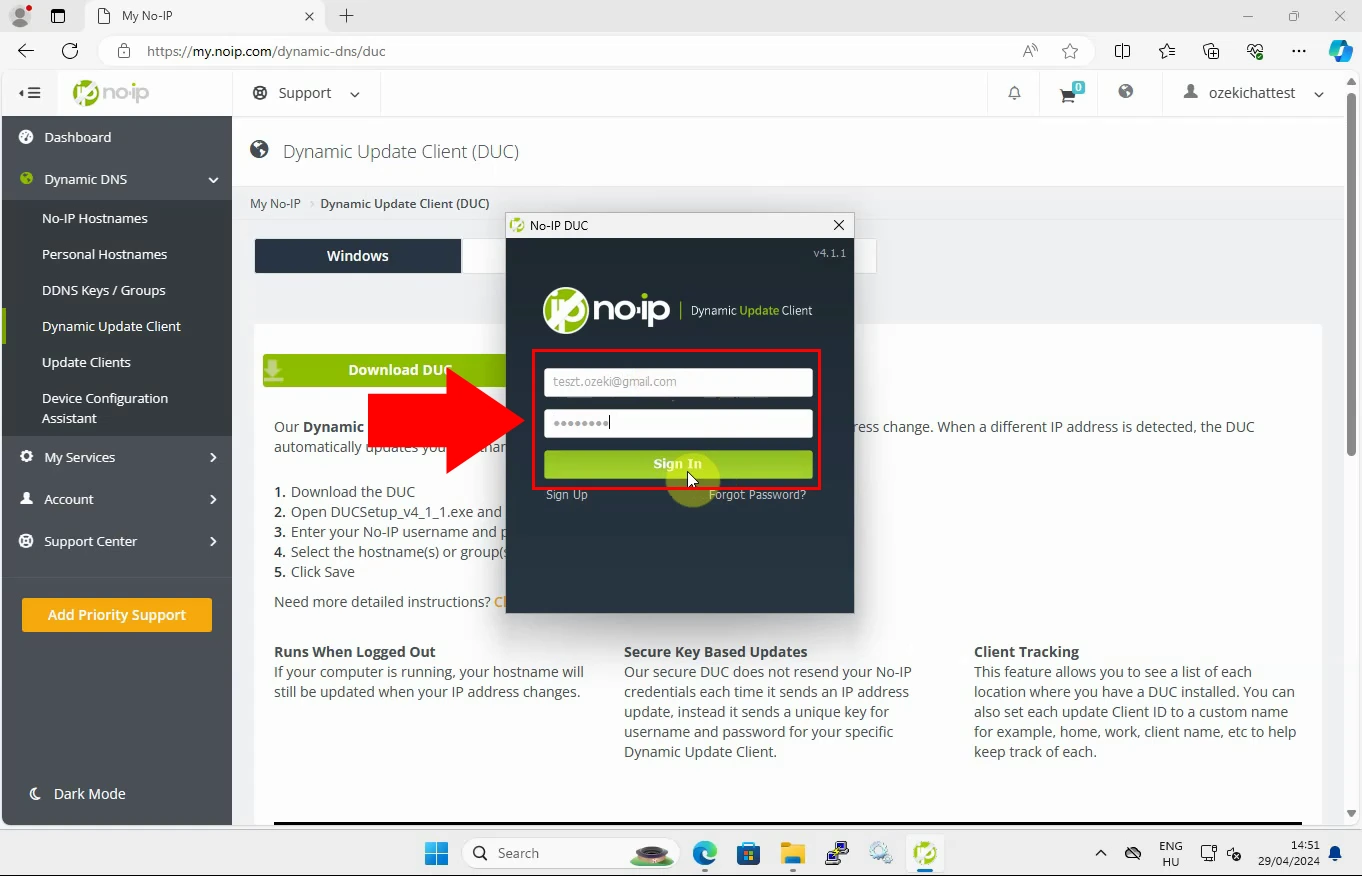
Open the Dynamic Update Client. If the client did not run automatically, open it from your programs list or desktop. Enter your credentials in the Dynamic Update Client application. Add your No-IP account email address and password, and then click "Sign In". (Figure 12)
After signing in, you will see a list of domain names associated with your No-IP account. Select the domain name you wish to use. After that click on the "Save" button. (Figure 13) This is the domain that the Dynamic Update Client will keep updated with your current IP address.
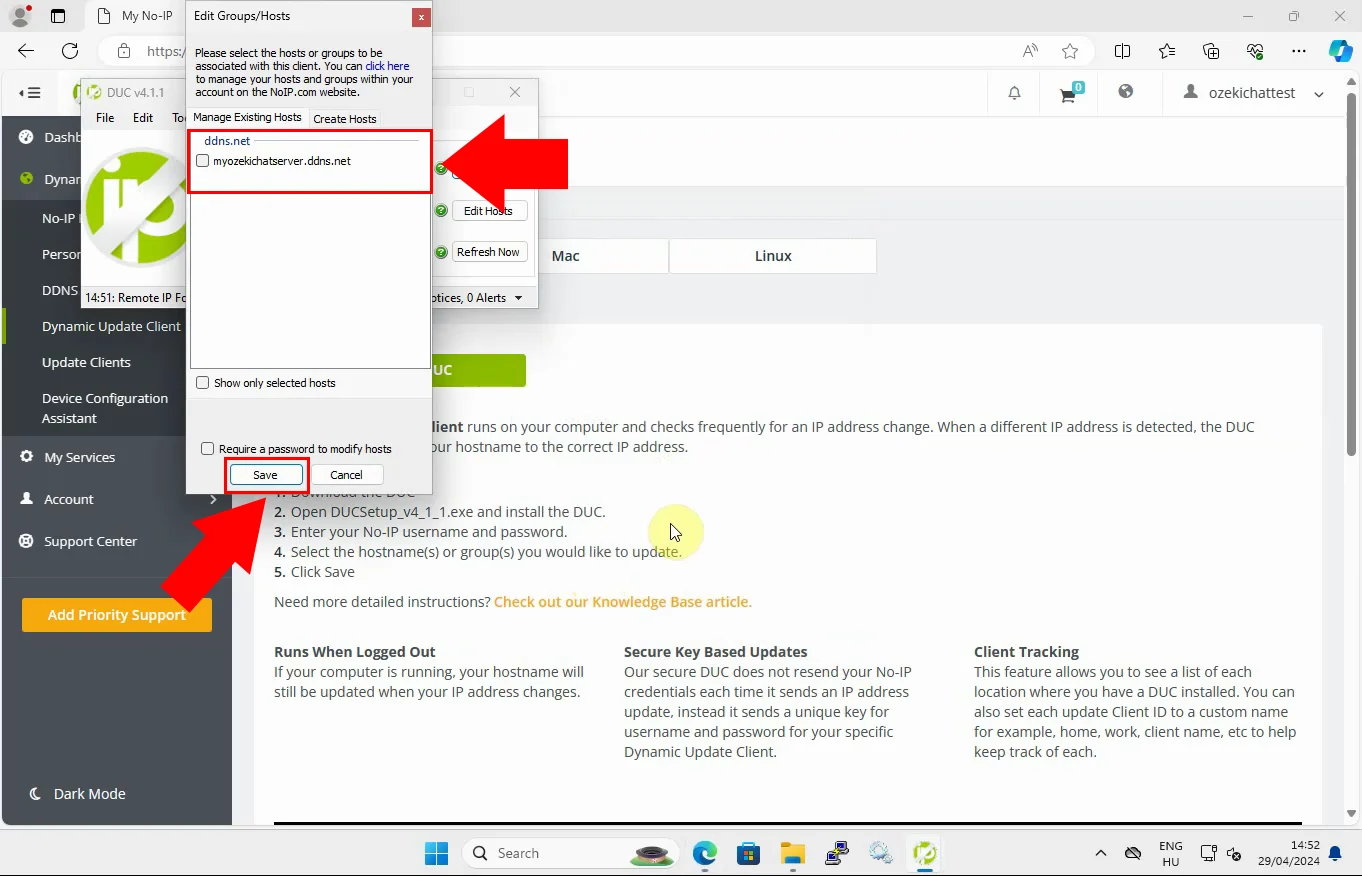
Now, verify client operation. Ensure that the Dynamic Update Client is running. The client will now operate in the background, periodically checking your IP address and updating the selected domain name if it changes. You can verify that the client is working correctly by checking its status or logs within the application interface. (Figure 14)
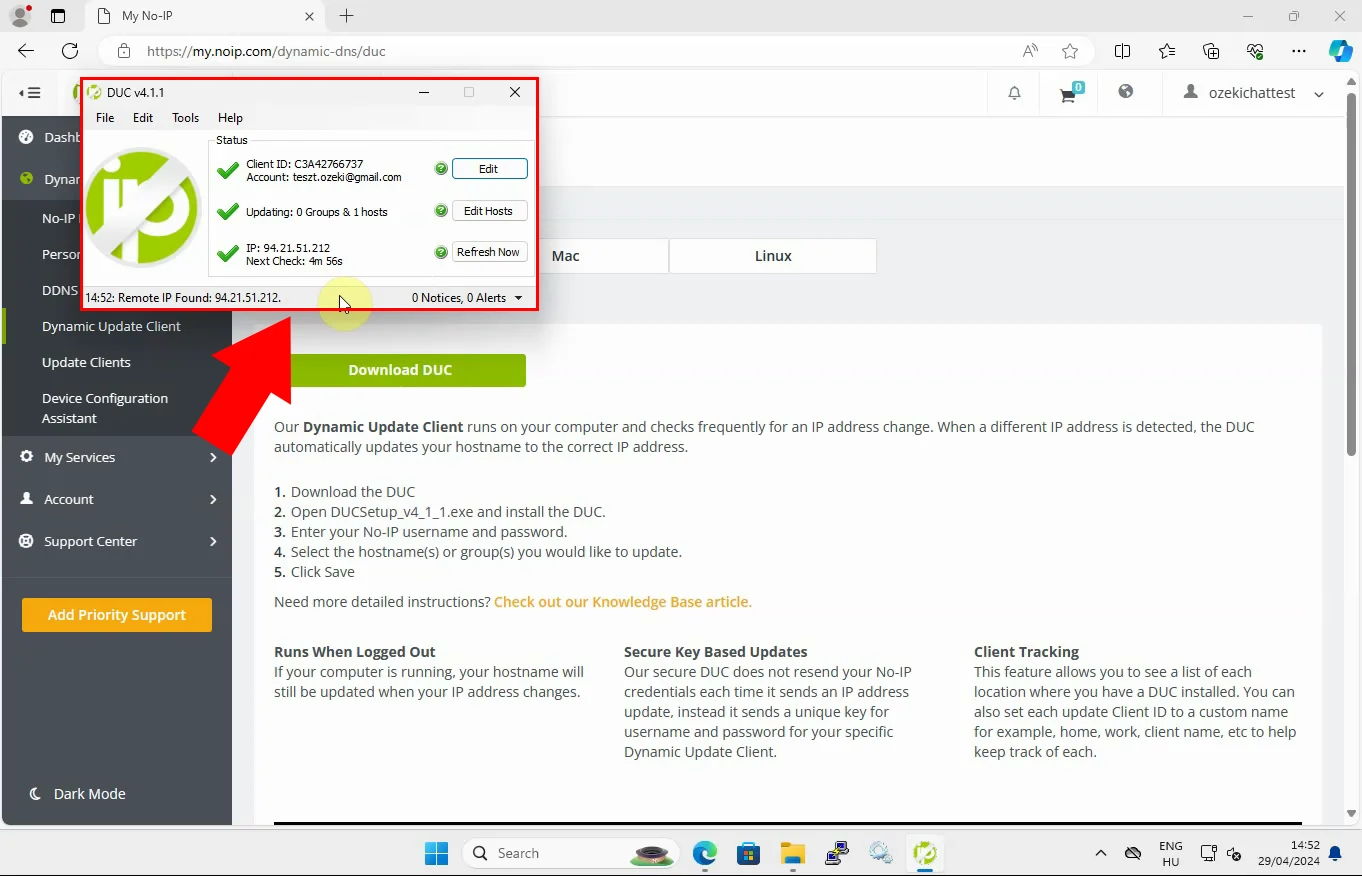
In this subsequent pase of the process, open the Command Prompt and verify your domain name. This video will be about to give a comprehensive guide to confirm that your domain name is being updated by the No-IP Dynamic Update Client. Follow the steps, and complete the task easily.
To verify that your No-IP Dynamic Update Client is functioning correctly, first copy your hostname, then open the Command Prompt or terminal on your computer. (Figure 15)
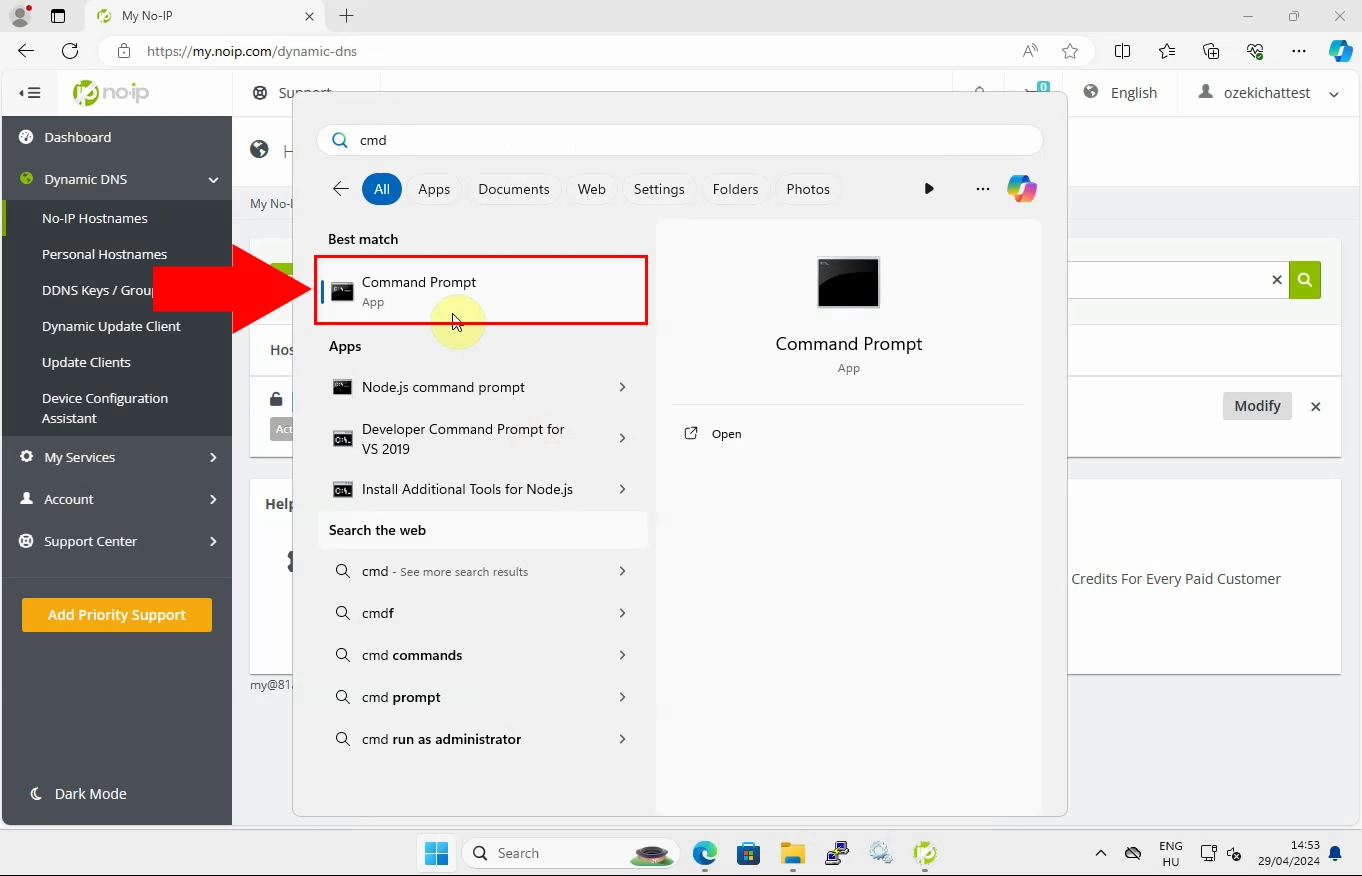
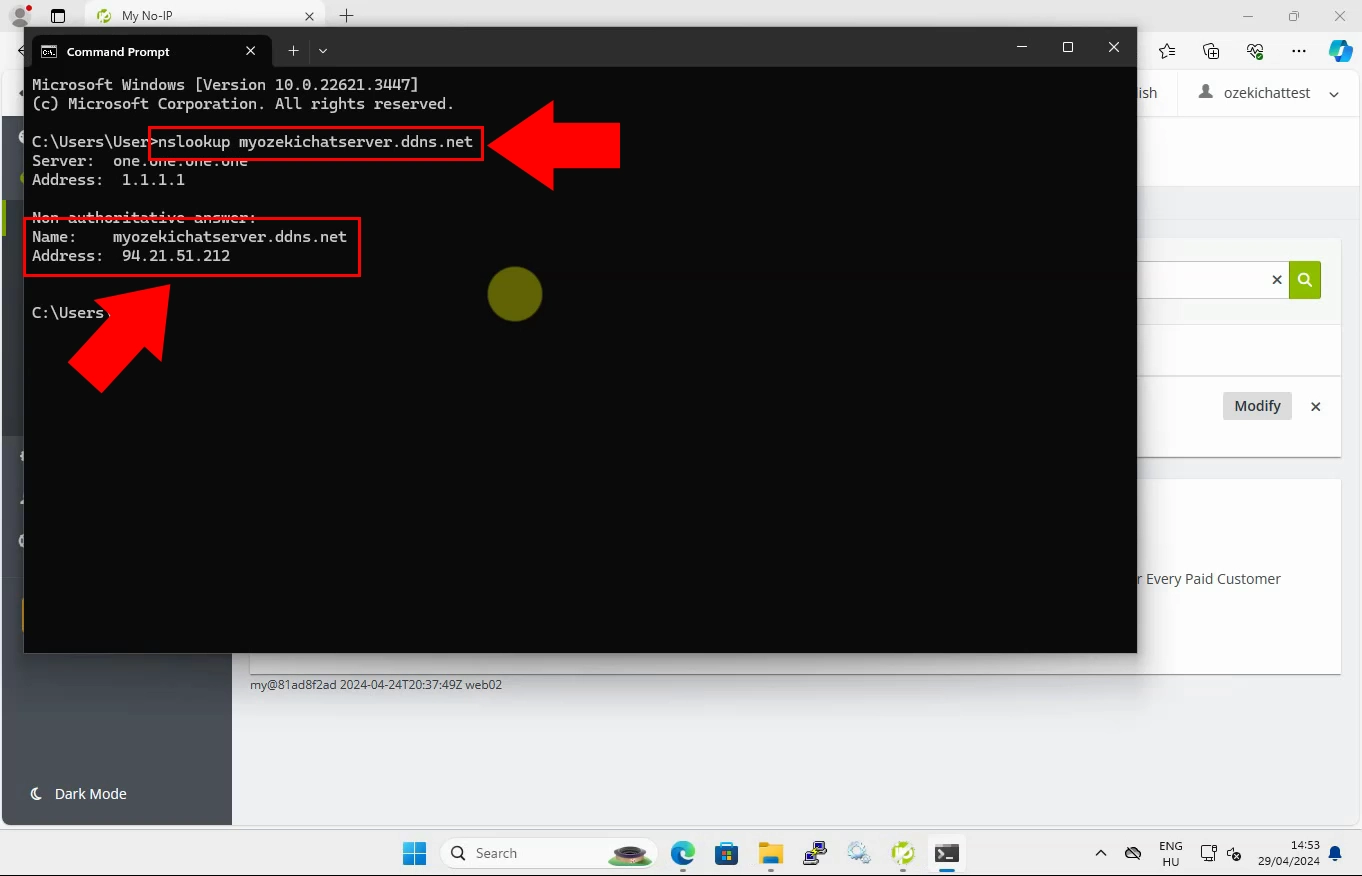
In the Command Prompt have to contain with your actual hostname. (Figure 16) If the No-IP Dynamic Update Client is functioning correctly, the IP address displayed in the output should match your current public IP address. This verification confirms that your domain name is being updated accurately, ensuring consistent access to your services.
FAQs
What is Dynamic DNS (DDNS), and why do I need it?
Dynamic DNS (DDNS) is a service that automatically updates the DNS records when your IP address changes. This is particularly useful for users with dynamic IP addresses who need to host services such as websites, email servers, or remote access applications.
Why choose No-IP for setting up a DDNS client?
No-IP offers a user-friendly interface, reliable service, and a range of plans to suit different needs, from personal to professional use. Additionally, No-IP provides robust support and documentation to help users through the setup process.
Is there a cost associated with setting up a DDNS client using No-IP?
No-IP offers both free and paid plans. The free plan provides basic functionality, while paid plans offer additional features such as priority support, enhanced security, and more customizable options.
What happens if my IP address changes?
If your IP address changes, the Dynamic Update Client (DUC) provided by No-IP automatically updates the associated DNS records to ensure uninterrupted access to your services. You don't need to manually intervene in most cases.
Conclusion
Setting up a Dynamic DNS (DDNS) client using No-IP is made simple with our comprehensive guide. We provide clear instructions from start to finish, ensuring that every step is easy to follow. Whether you're registering and creating a hostname on the No-IP website or downloading and installing the Dynamic Update Client (DUC) onto your system, our guide walks you through the process effortlessly. With visual aids and straightforward Command Prompt instructions, verifying your domain name is a breeze. Armed with this knowledge, managing your DDNS client becomes a straightforward task, ensuring uninterrupted access to your services.
More information
- How to setup a Dynamic DNS client - Example 1
- How to setup a Dynamic DNS client - Example 2
- How to setup a Dynamic DNS client - Example 3

