
 Sign in
 How to connect your Android Mobile to the
Ozeki Phone System
Use your smartphone as a mobile SIP extension by using the CSIPSimple application. For this purpose, you need to install the CSipSimple application on your Android Mobile Phone, and Ozeki Phone System on your Windows PC. This guide describes what else you need and how you should configure your mobile in order to turn your smartphone into a full-featured extension of your VoIP network.
Are you an Apple user? Click here
How to create a connection
|
Step 1: Creating a SIP account in Ozeki Step 2: Installing CSipSimple Step 3: Configuring CSiPSimple Step 4: Setting up dial plans Step 5: Making a test call |
|
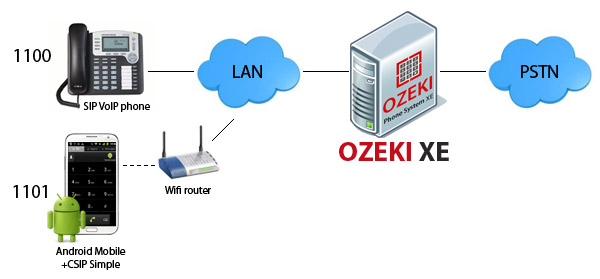
Step 1: Create a SIP account in Ozeki XE
In order to connect your Android phone to Ozeki Phone System, you need to create a SIP Extension, first.


You can find a detailed guide about how to create a SIP Extension here.
Step 2: Installing CSipSimple
In order to connect your mobile phone to your communication system, you need an application that can be used to turn your phone into a mobile extension. One of the most reliable apps is CSipSimple.
In order to install CSipSimple you need to download it from Google Play:
- Option 1: Visit Google Play website: Download from Google Play
- Option 2: Scan the following QR code:

Step 3: Configuring CSipSimple
1. After you have launched CSipSimple, select the most appropriate connection method then click the Save button (Figure 2).

2. Click on "Add account" then select the "Basic" menu item from the Generic wizards (Figure 3).

3.
-
Now, you need to provide the user data that you defined earlier in Ozeki Phone
System XE WebGUI:
- First, click on "Account name" and specify the name of your account (Figure 4).
- After dialing, you have to choose the call's destination: Mobile or VoIP.
- After it is done, click the OK button.
- Similarly, click on "User" and enter the phone number of the new extension. Your mobile phone will be available on this telephone number.
- Click on the OK button.
- After that, select "Server" and type the IP address of your Ozeki Phone System XE.
- Click on the OK button.
- Finally, choose "Password" menu item and enter the password of the extension.
- Click on the OK button.

4. After providing proper user data, your new account will be a Registered one. It shows that your mobile phone is ready to use. Click on "Accounts" in the top left-hand of the screen and the keypad will appear (Figure 5).

Step 4: Setup dial plans
Step 5: Make a test call
In order to make a call;
- enter a phone number (the number of the extension you would call) by using the keypad.
- click on the telephone icon to initiate the call.
On Figure 6, you can see that our sample extension (1002) called an other SIP extension (1004) and the last picture shows an incoming call as well, from the other extension (1004).

Conclusion
The guide above presented how to connect your Android Mobile (smartphone and tablet as well) to Ozeki Phone System. If you follow these steps, you will be able to install and configure the CSipSimple application and to use your Android Mobile as a full-featured mobile extension of your communication system.
If you have any questions or need assistance, please contact us at info@ozekiphone.com
- How to connect your Apple Mobile to Ozeki Phone System
- Mobile communication PBX in your office
- How to create advanced VoIP telephone network
- Webphone Technology - Live chat, voice calls, video calls, click to call
More information
- How to connect your iPhone to Ozeki Phone System PBX
- How to connect your Android Mobile to Ozeki Phone System PBX