How to setup VoIP at home
This article is a step-by-step guide that will help you to build up a VoIP connection at home in a few minute's time. You can get to know what devices are needed and what you should do in order to have connection to a VoIP network in your home. To get to know everything about the setup process, please keep on reading.
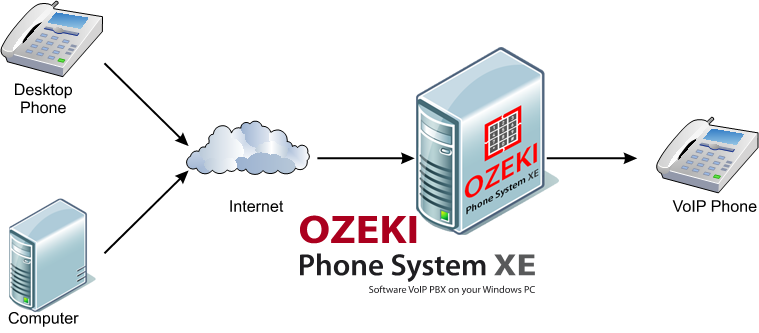
Once you have set up your VoIP connection, you can make calls like Figure 1 represents. You can inititate the VoIP call from a desktop phone or a computer. The call goes through the Internet, arrives to your Ozeki Phone System server (Private Branch eXchange, PBX) that forwards it to the called number.

One of the recent trends in home and business communication is Voice over IP (VoIP). Setting up a VoIP connection at home is as easy counting to ten. Let us see how.
Home VoIP connection setup
To have a VoIP connection you must have this equipment:
- broadband Internet connection
- a VoIP service provider subscription
- a DSL modem (provided by the Internet service provider in most cases)
- an ATA adapter (analog telephone adapter – this connects the analog phone lines to the VoIP network
- a switch or router or any device that can replace these
- a phoning device
- Ozeki Phone System PBX
The Setup Procedure
To setup the VoIP network at home, you must follow these steps:
-
be sure that all your devices are unplugged
-
plug the devices together:
- plug in one end of the Ethernet cable to the DSL modem's FXO port
- plug in the other end of the Ethernet cable to the ATA adapter's Internet port
- if you have a computer that you intend to use for voip communication, you must connect that computer with the ATA with another Ethernet cable, using another Internet port of the ATA (ATAs usually have 3 such ports). If you want to connect a router instead, you can do it the same way as you would do in the case of computers
- plug your traditional telephone into the ATA: take the phone jack and plug it into "Phone Port 1" of the ATA
-
now plug in your devices to have electricity in order:
- first the DSL modem
- than the ATA adapter
- the computer or router
- and the traditional phone in the end
-
Setup your Ozeki Phone System (see below)
Setup of your Ozeki Phone System
After having done this, to be able to manage more than one VoIP calls you must have a PBX installed. With your Ozeki Phone System PBX you can have features like:
- call management: call hold, call forwarding, call transfering, defining extensions, defining ring groups, using Interactive Voice Response (IVR) and Music On Hold (MOH)
- call screening: hiding/showing caller ID, blocking calls
- away from the phone: voicemail, text messages, e-mail/SMS notifications
- bandwidth saving: call recording, dial plan setting
- administration: IP phone support, Daylight Savings Time Adjustment
- convenience: directory with names and extensions, list of frequently called numbers
- etc.
The list of features is almost endless.
To setup your Ozeki Phone System you have nothing else to do but to check the system requirements, download and install the software and enter the webGUI (graphical use interface). In the webgui you can find your Ozeki Phone System menu: with the help of this menu, you can make all your phoning devices to become an extension in your home network.
As soon as a device became an extension in your Ozeki Phone System network, you can make configurations on it: add to a óring group, configure its place in the dial plan, set up recording policies, and so on.
To get to know more about VoIP communication and your Ozeki Phone System working method, do not hesitate and keep on reading:
- How to setup an ISDN to VoIP Gateway
- How to setup Direct Dial In (DID)
- How to setup Ozeki PBX
- How to setup a VoIP service
How to setup VoIP at Home (Video tutorial)
More information
- How to setup Ozeki PBX
- How to setup Call Recording
- How to setup Call Center
- How to setup a VoIP Gateway
- How to setup a PBX Cluster
- How to setup Ozeki PBX on VMWare
- How to setup Ozeki PBX on KVM
- How to setup Ozeki PBX on ESXi
- How to setup a VoIP service
- How to setup Direct Dial In (DID)
- How to setup a Mobile VoIP Extension
- How to setup an ISDN to VoIP Gateway
- How to setup VoIP at Home
- VoIP installation on DSL
- How to setup VoIP on Broadband
- How to setup a Linksys 3102 ATA
- How to setup a LinkPRO VIP200S, VIP 201T ATA
- How to setup Asterisk VoIP Server and Ozeki PBX
- How to setup Fring VoIP calls with Ozeki PBX

 Sign in