
 Sign in
 How to setup Ozeki VoIP GSM Gateway 1 channel edition for Ozeki Phone System
The Ozeki VoIP GSM Gateway is a product for seamless connection between the GSM network and VoIP network. When SIM card of the mobile phone is installed in the Ozeki VoIP GSM Gateway, users can make calls from the Ozeki Phone System toward the Public Switched Telephone Network.
Installation
- What you need
- Opening the box
- Connecting the DC Adapter and a SIM card to each other
- Connecting the Ozeki VoIP GSM Gateway to a computer
- Network settings in the Ozeki VoIP GSM Gateway
- SIM Card Settings in the Ozeki VoIP GSM Gateway
- SIP Settings in the Ozeki VoIP GSM Gateway
- Dialing rules in the Ozeki VoIP GSM Gateway
- Settings in the Ozeki Phone System
- Video tutorial about how to connect Ozeki VoIP GSM Gateway to Ozeki Phone System
1. What you need
In order to make calls from the Ozeki Phone System through a GSM network you need to connect the Ozeki VoIP GSM Gateway 1 channel edition and the Ozeki Phone System XE together and you need to insert a SIM card into the Ozeki VoIP GSM Gateway. In the Figure 1 you can see the accessories:
- SIM card: It is used to provide a connection to a GSM service provider. You can buy it directly from a GSM service provider.
- Ozeki VoIP GSM Gateway: It is a device that is used between the GSM network and the Ozeki Phone System. It is a gateway that allows you to make calls toward the Public Switched Telephone Network from the VoIP phone network. You can order it directly from Ozeki with delivery times of 2-3 weeks.
- Ozeki Phone System: It is a VoIP phone system for Windows operating system. It allows you to make calls toward the GSM network with the help of Ozeki VoIP GSM Gateway. You can order it directly from Ozeki.

2. Opening the box
After you have got the Ozeki VoIP GSM Gateway package, first unpack the box. In the Figure 2 you can see the box that you should get.

The Figure 3 shows the opened package with its content.

After you have taken the accessories out of the box, you should check them. The Figure 4 shows what you can find in the box (from right):
- 1× Ozeki VoIP GSM Gateway
- 1× DC Power Adapter
- 1× Ethernet cable
In addition you can see a mini-SIM card (25.00 mm × 15.00 mm × 0.76 mm) that will be inserted into a SIM card slot (Figure 4 on the left).

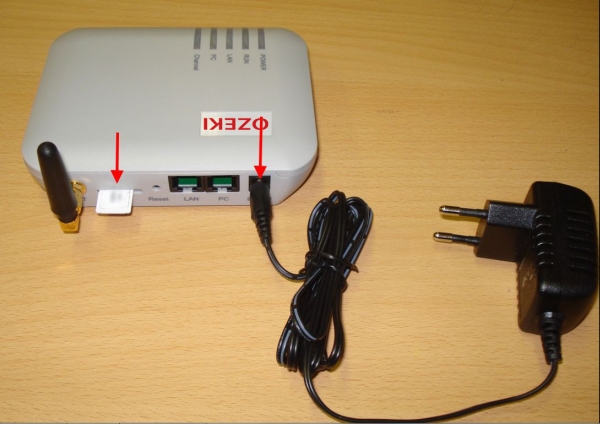
3. Connecting the DC Adapter and a SIM card to each other
After you have checked the content of the package, you need to connect the Ozeki GSM Gateway to a plug, to the computer network and you need to put one-four SIM card(s) into the device.
The Figure 5 shows the slots where the SIM cards and the DC adapter have to be plugged.
- The DC adapter is plugged into the rightmost connector that is signed with a DC12V label.
- The SIM card is plugged into the slot which is located next to the antennas. The chip on the SIM card has to see up when you put it into the slot.
After you have inserted the SIM cards into the slots you need to push it while a click is not listened (Figure 6).

4. Connecting the Ozeki VoIP GSM Gateway to a computer
If the SIM card and DC adapter have been plugged, you need to connect the Ozeki GSM Gateway to a computer to set the IP address of the device.
To connect a gateway and a computer to each other you need to use a straight-through Ethernet cable (the yellow cable on Figure 7). One of the ends of the cable has to be plugged into the Ethernet port of the computer and the other has to be plugged into the PC port of the Ozeki VoIP GSM Gateway.

Now you can configure the Ozeki VoIP GSM Gateway in a web browser.
By default the IP address of the gateway’s PC port is 192.168.8.1. To reach the graphical user interface of the device you need to set an IP address on the Ethernet port of the computer that is in the same network. The IP address of the PC can be from the range of 192.168.8.2 – 192.168.8.254.
5. Network settings in the Ozeki VoIP GSM Gateway
Open a web browser, such as Internet Explorer and enter http://192.168.8.1 in the address bar. Then the login page is popped up (Figure 8) to give the username in the User Name and password in the Password field (root username: admin; root password: admin).

After you have clicked on the Ok button, the Status page will be loaded. To set the IP address of the gateway, click on the Configurations and Network links. The Figure 9 shows what you need to set on the LAN port:
- LAN port mode: Static IP.
- IP address: An address from the network to which you would like to connect the gateway.
- Subnet mask: The proper mask that belongs to the connected network.
- Default route: The IP address of the default gateway. This is the IP address of that router’s interface which is connected to the local computer network.
- Primary DNS: The IP address of the domain name server that is responsible for assigning the IP addresses and the domain names.

Then click on the Save Changes and follow the below instructions:
- Connect the gateway to the local computer network through the LAN port of the device (Figure 10).
- Disconnect the computer from the gateway and connect it back to the local computer network.
- Set the IP address of the computer back.

After doing these settings, you can configure the Ozeki VoIP GSM Gateway from any computer in the same computer network. Just type the previously set IP address to the web browser, give the login data and you can configure it from anywhere.
6. SIM Card Settings in the Ozeki VoIP GSM Gateway
After you have inserted the SIM card into the device, you need to add the phone number and unlock code (PIN code).
Click on the Call Management link under the Configurations menupoint on the left side of the web page (Figure 11).
On the right side of the web page, find the SIM Card Parameters and click on it. On the loaded section, give the following data:
- SIM Card Number textbox: GSM phone number that belongs to the SIM card.
- Unlock PIN textbox: PIN code that belongs to the SIM card.

7. SIP Settings in the Ozeki VoIP GSM Gateway
To connect the gateway to the phone system, choose the VoIP menupoint from the menu on the left side (Figure 12).
On the right side of the page the configuration page will be loaded. You need to choose the Config by Line configuration mode, where you can connect every line (Line 1-4) to the Ozeki Phone System by giving the following data:
- Phone Number: This parameter is used to set the telephone number of the line. The telephone number is a unique ID that is served by the Ozeki Phone System.
- Display Name: It can be anything.
- SIP Proxy: This parameter is used to set the address of the SIP proxy server. If the SIP proxy server uses the special port (other than the SIP default port 5060), you can add the detailed port number at the end of the IP address or domain name of the proxy server. For example, 192.168.2.26:3000 or pbx.com:3000.
- SIP Registrar Server: This parameter is used to set the IP address or domain name of the SIP registration server. You can use the same method for setting a port number than in case of a SIP Proxy.
- Outbound Proxy: This parameter is used if the server has a private address. In that case you need to type that IP address or host name.
- Home Domain: This parameter is used for the domain management host of the SIP (a host that provides the SIP service).
- Authentication ID: This parameter is used for the authentication process. The same value will also be registered in the Ozeki Phone System XE.
- Password: This parameter is used for the authentication process. The same value will also be registered in the Ozeki Phone System XE.

After you have filled every texbox, click on the Save Changes button. If you use more than one SIM card, you need to set the Line 2, Line 3 or Line 4 as well.
If you have set the phone lines under the VoIP menupoint, you need to give the same values in the Ozeki Phone System as well. For more information, see the chapter 8.
8. Dialing rules in the Ozeki VoIP GSM Gateway
The Ozeki VoIP GSM Gateway supports number dialing by rules. To use a dial plan, choose the Call Management option in the left menu (Figure 13).

In the Call OUT via GSM and Call IN via GSM sections you can set the followings:
- Forward Number: In case of an outgoing call the phone calls will be forwarded to the given phone number. Or if a call is incoming the given extension will be ringing in the connected VoIP network.
- Dial Plan textbox: In case of an outgoing call you can add a rule for the destination phone number. It can be necessary if a call is coming from the PBX, and a prefix was used in front of the phone number. In this case the rule will remove the prefix from the front of the number. For example:
- The prefix is 82 and the destination 0036301234567. This means that the called number is 820036301234567.
- Dial plan: 82:-82
- Using this dial plan, the 82 prefix will be removed from the front of the phone number, so the 0036301234567 phone number will be called.
Format of Dialing Rules
- You can specify multiple rules, which are separated by the delimiter „|?. For example, “00:-00|0:-0+86|:+86755”.
- The number is matched from the left of the dialing rules to the right. When the number matches the correct rule, the number stops matching. Otherwise, the number continues to match the next rule.
- The rule format is “AA:-aa+bb”. Where, “AA” indicates the number to match and “-aa+bb” indicates detailed actions to be taken on the number. If the number is successfully matched, “aa” is deducted and “bb” is added. If the number fails to match, the number continues to match the next rule.
- You can specify a range for matching of dialing rules. The rule format is “[A-B]A:-aa+bb” or “A[A-B]:-aa+bb”. For example, you can specify the range of numbers beginning with 2 to 8 as “[2-8]: -aa+bb” or numbers beginning with 13 to 15 as “1[3-5]: -aa+bb”.
9. Settings in the Ozeki Phone System
After you have set the Ozeki VoIP GSM Gateway, you need to add an Outside line in the Ozeki Phone System in order to connect the two devices to each other.
First start the Ozeki Phone System and log in with your username and password (Figure 14).

Then click on Install next to PSTN device option in Outside lines section (Figure 15). If there is an installed outside, click on the Install new button next to the Outside line label and then select the PSTN device option.

On the next page you need to enter the parameters for the previously installed Ozeki VoIP GSM Gateway on the configuration form. Please provide the followings under the General configuration page (Figure 16):
- Connection name: It is the name that will appear in the list of the Outside lines.
- Username: It is the value that you have given in the gateway as a Phone Number.
- Authentication name: It is the value that you have given in the gateway as an Authentication ID.
- Password: It is the value that you have given in the gateway as a Password.
- IP address: It is the IP address that you have given for the LAN port of the gateway.

On the Calls tab you can set which phone number will be used in case of an outgoing call and which prefix should be used to make a call toward the Ozeki VoIP GSM Gateway (Figure 17).
Example for call toward the Ozeki GSM Gateway: if the prefix is 82 and the destination phone number is 0036302224455, you need to dial the 820036302224455 phone number.

There are two ways of forwarding the incoming calls to an extension:
- In the Ozeki VoIP GSM Gateway: For more information, see the chapter 7.
- In the Ozeki Phone System: You need to add a new dial plan.
If you choose to set the dial plan in the Ozeki Phone System, follow the below instructions.
To add a new dial plan, click on the Add rule button in the Dial plan section (Figure 18).

On next page (Figure 19) the configuration form will be displayed. Under the Description tab you only need to give a description about the rule.

On the Source tab (Figure 20) you need to determine the outside line on which the calls are incoming. From the Specific outside line options, select the PSTN device that belongs to the Ozeki VoIP GSM Gateway.

And finally on the Destination tab (Figure 21) choose a Specific extension that will be ringing in case of a call through the Ozeki VoIP GSM Gateway.

Finally click on the OK button and the Ozeki Phone System will be ready for making or receiving calls through the Ozeki VoIP GSM Gateway.
10. Video tutorial about how to connect Ozeki VoIP GSM Gateway to Ozeki Phone System
Conclusion
This guide above presented how to setup Ozeki VoIP GSM Gateway for Ozeki Phone System XE. If you follow these steps you will able to establish connection between the GSM network and the IP network quickly and easily.
If you have any questions or need assistance, please contact us at info@ozekiphone.com
Read more about Ozeki VoIP GSM Gateway:
More information