
 Sign in
 How to use the Local Addressbook Provider in Ozeki Phone System
In this page, you can see how to use the Local Addressbook Provider in Ozeki Phone System.
First of all login to Ozeki Phone System using your username and password (Figure 1).

Select PBX Features and then the Addressbook menu (Figure 2).

Click on the Providers button in the left menu to see the Local Addressbook Provider.

You will see the Local Addressbook and User Addressbook providers in the Addressbook Providers window. They are built in providers meaning they are added to Ozeki Phone System by default and you cant delete them (Figure 4).

You will notice that there aren't any entries in the default providers. There are two ways to add new entries to them, first you can add them one by one manually or you can import them from .CSV and .XML files. Let's take a look how you can add them manually first. Click on the Contacts button in the left menu (Figure 5).

Select the Local Addressbook Provider in the Contacts window as you can see on Figure 6.

Once you have selected the local addressbook provider click on the Add contact button (Figure 7).

A window will open, where you can give the contact details. After you have given the necessary information that you can see on the following figure click on the OK button (Figure 8).

You will find yourself in the Contacts menu, select the Local Addressbook Provider just like on Figure 6. You should see the previously added contact (Figure 9).

This is how you can add a new contact by hand so let's see how you can import them. For this purpose click on the Import button in the left menu (Figure 10).

You can import the contacts from a .CSV or an .XML file as I have said earlier. I am going to show you how you can add contacts from an XML file, but it works the same way with a CSV file too. In case you dont know how the .xml file should look like you can download an example file (Figure 11).

After you have downloaded the example file click on the Browse file button (Figure 12).

In the browse window select the downloaded XML file, that is named addressbookimportxml and click on Open (Figure 13).

After you have opened the XML file click on the Import button on the bottom of the screen (Figure 14).

The importation should have happened succesfully, to check it select the local addressbook provider just like on Figure 6, you should see three new contacts (Figure 15).

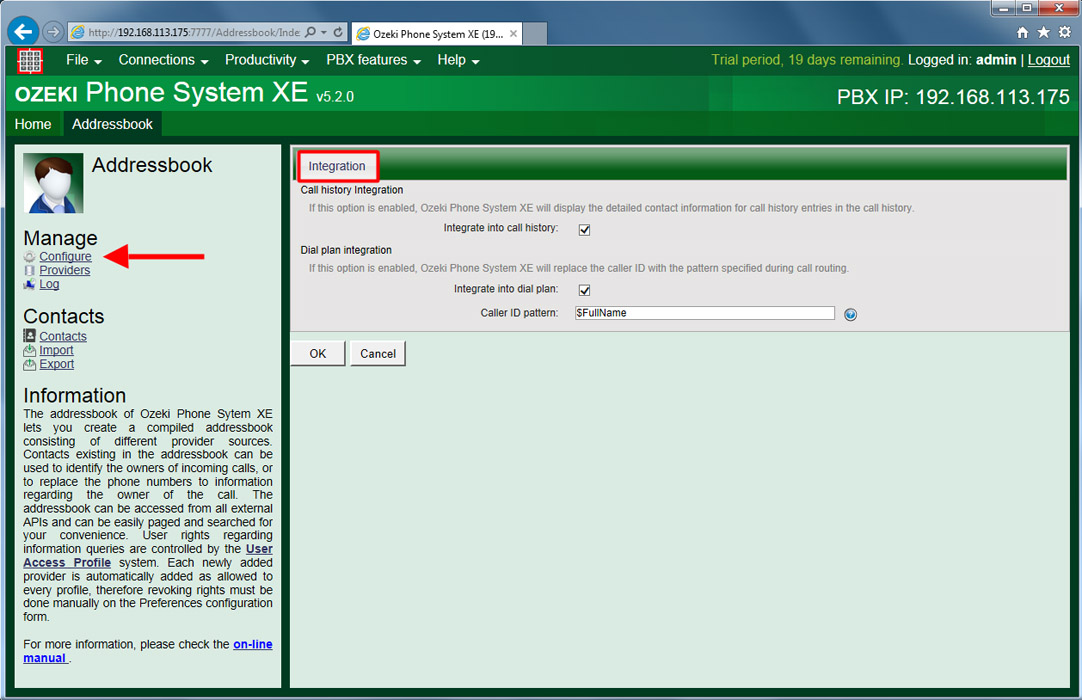
With this we are finished with the local addressbok provider so let's talk about some of the general featuers of the Addressbook itself. Click on Configure in the left menu, you configure the following things in it:
- Call history Integration: If this option is enabled, Ozeki Phone System XE will display the detailed contact information for call history entries in the call history.
- Dial plan integration: If this option is enabled, Ozeki Phone System XE will replace the caller ID with the pattern specified during call routing.
In the Caller ID pattern textbox you need to provide the parameter name to be replaced with the caller ID (Figure 16). The following parameters can be used here: $FirstName, $LastName, $Company, $Extra, $BusinessTel, $HomeTel, $OtherTel, $MobileTel, $Fax, $BusinessEmail, $HomeEmail, $OtherEmail, $BusinessAddress, $HomeAddress, $OtherAddress, $FullName, $PhoneNumber, $Email.
If you have any questions or need assistance, please contact us at info@ozekiphone.com
Dig deeper!
People who read this also read...
- How to select contacts from your Database
- How to add new contacts in your PBX
- How to use the contacts of your Activedirectory
More information
- How to setup Local Addressbook Provider
- How to setup User Addressbook Provider
- How to setup database addressbook provider
- How to setup HTTP Addressbook Provider
- How to setup LDAP Addressbook Provider