
 Sign in
 How to use the HTTP Addressbook Provider in Ozeki Phone System
The HTTP addressbook provider enables you to provide contact information in response to HTTP requests originating from Ozeki Phone System. In this page, you can see how to install and configure the HTTP Addressbook Provider in Ozeki Phone System.
First of all login to the Ozeki Phone System using your username and password (Figure 1).

Select PBX Features and then Addressbook menu (Figure 2).

On this page, you can query the contacts of your Addressbook providers. To install an HTTP addressbook provider, click on Providers button in the left menu (Figure 3).

On this page, you can see the list of your providers. By default, the User Addressbook Provider and Local Addressbook Provider cannot be deleted. If you wish to provide your existing contacts trhough an HTTP Response, click on Add provider button (Figure 4).

Here, you can see what kind of addressbook providers can be installed. You need to click on Install button belonging to HTTP addressbook provider. By default, each newly added provider is automatically added as allowed to every profile. It can be modified manually under the configuration page of User Access Profile (Figure 5).

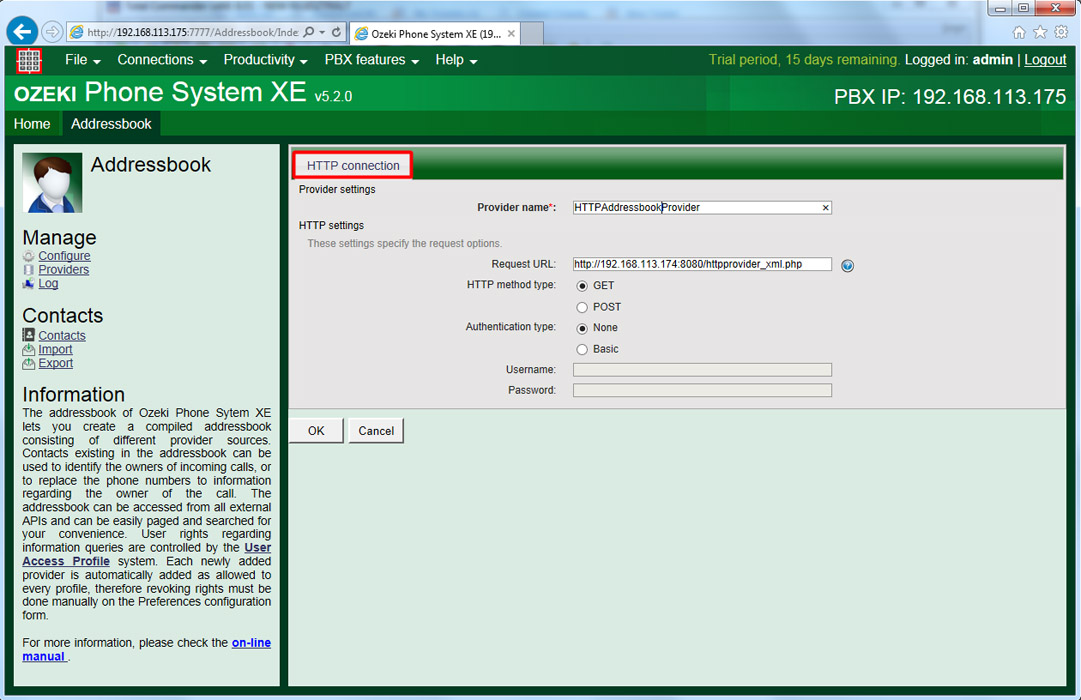
Figure 6 shows the configuration form of HTTP addressbook provider where you can specify the following:
- Provider name: A unique name for this provider.
- Request URL: An URL (for example a PHP file) that will respond to the HTTP request originating from Ozeki Phone System.
- HTTP method type: The type of the HTTP Request sent by Ozeki Phone System. It can be GET or POST
- Authentication type: If your web server requires authentication, select basic type and provide a username and a password.
Ozeki Phone System always uses the Action parameter in the HTTP requests. The value of the Action parameter can be the followings: GetEntryCount, GetEntriesPaged and GetEntryById.
Two simple PHP examples (XML and JSON) can be downloaded here.
An advanced PHP example (XML) can be downloaded here. This example shows you how to query the available contacts based on the HTTP Request parameters coming from Ozeki Phone System.
GetEntryCount: The HTTP response gives the number of contacts back. It is only a number.
37
GetEntriesPaged: GetEntriesPaged action is used when you select an HTTP addresbook provider under Contacts menu or do a quick search or an advanced search.
Default parameters:
- PageNumber: The page number you would like to see in the GUI of Ozeki PBX.
- RowsPerPage: The number of contacts on the given page.
These values can be set in the LIMIT section of a SELECT SQL query (e.g. "LIMIT 30, 50". With this query you can select rows from 30 to 80 in a table). An example be seen in the advanced PHP example.
Quick search parameters (default parameters are also used):
- General: For example the name of the contact.
Advanced search parameters (default parameters are also used):
- FirstName: The first name of the contact.
- LastName: The last name of the contact.
- Company: The company name of the contact.
- Email: The e-mail address (business, home or other) of the contact.
- TelephoneNumber: The telephone number (business, home, other or fax) of the contact.
- Address: The address (business, home or other) of the contact.
XML response:
<AddressbookResult>
	<TotalRecords>2</TotalRecords>
	<AddressbookEntries>
		<AddressbookEntry>
			<id>52f8a05f212808063c9b519bd</id>
			<FirstName>Ted</FirstName>
			<LastName>Morrow</LastName>
			<Company>Company ltd.</Company>
			<BusinessTel>+36301324567</BusinessTel>
			<BusinessEmail>tedtmorrow@yourcompany.com</BusinessEmail>
			<BusinessAddress>Company str. 33/2</BusinessAddress>
		</AddressbookEntry>
		<AddressbookEntry>
			<id>52f8a05f212808063c9b519cd</id>
			<FirstName>Leslie</FirstName>
			<LastName>Johnson</LastName>
			<Company>Company ltd.</Company>
			<BusinessTel>+36301324568</BusinessTel>
			<BusinessEmail>lesliejohnson@yourcompany.com</BusinessEmail>
			<BusinessAddress>Company str. 33/3</BusinessAddress>
		</AddressbookEntry>
	</AddressbookEntries>
</AddressbookResult>
JSON response:
{"TotalRecords":2,"Entries":[
{"id":"52f8a05f212808063c9b519cd","FirstName":"Leslie","LastName":"Johnson","Company":"Company ltd.",
"BusinessTel":"+36301324568","BusinessEmail":"lesliejohnson@yourcompany.com","BusinessAddress":"Company str. 33/3"},
{"id":"52f8a05f212808063c9b519bd","FirstName":"Ted","LastName":"Morrow","Company":"Company ltd.",
"BusinessTel":"+36301324567","BusinessEmail":"tedtmorrow@yourcompany.com","BusinessAddress":"Company str. 33/2"}
]}
GetEntryById: The HTTP response gives different contact information back to Ozeki Phone System in XML or JSON format based on the provided Id in the HTTP Request.
Additional parameter:
- Id: The unique id of an entry.
XML response:
<AddressbookEntry>
	<id>52f8a05f212808063c9b519cd</id>
	<FirstName>Leslie</FirstName>
	<LastName>Johnson</LastName>
	<Company>Company ltd.</Company>
	<BusinessTel>+36301324568</BusinessTel>
	<BusinessEmail>lesliejohnson@yourcompany.com</BusinessEmail>
	<BusinessAddress>Company str. 33/3</BusinessAddress>
</AddressbookEntry>
JSON response:
{"id":"52f8a05f212808063c9b519bd","FirstName":"Ted","LastName":"Morrow","Company":"Company ltd.",
"BusinessTel":"+36301324567","BusinessEmail":"tedtmorrow@yourcompany.com","BusinessAddress":"Company str. 33/2"}
You need to give the following parameters back to Ozeki Phone System in your web based application: Id (Id HAS TO BE UNIQUE), FirstName, LastName, Company, Extra, BusinessTel, HomeTel, OtherTel, MobileTel, Fax, BusinessEmail, HomeEmail, OtherEmail, BusinessAddress, HomeAddress, OtherAddress.
After you have installed an HTTP addressbook provider, on the next page, you can see the newly installed addressbook provider in the list of the providers. Clicking on the Configure button, you can make changes in the settings of this provider (Figure 7).

You can query the contacts of the addresbook providers under the Contacts menu. On the top of the page, you need to select the addressbook provider in which you wish to search (Figure 8).

Under the Configure menu, you can set the following:
- Call history Integration: If this option is enabled, Ozeki Phone System XE will display the detailed contact information for call history entries in the call history.
- Dial plan integration: If this option is enabled, Ozeki Phone System XE will replace the caller ID with the pattern specified during call routing.
In the Caller ID pattern textbox you need to provide the parameter name to be replaced with the caller ID (Figure 9).
The following parameters can be used here: $FirstName, $LastName, $Company, $Extra, $BusinessTel, $HomeTel, $OtherTel, $MobileTel, $Fax, $BusinessEmail, $HomeEmail, $OtherEmail, $BusinessAddress, $HomeAddress, $OtherAddress, $FullName, $PhoneNumber, $Email.

If you have any questions or need assistance, please contact us at info@ozekiphone.com
Dig deeper!
People who read this also read...
- How to select contacts from your Database
- How to add new contacts in your PBX
- How to use the contacts of your Activedirectory
More information
- How to setup Local Addressbook Provider
- How to setup User Addressbook Provider
- How to setup database addressbook provider
- How to setup HTTP Addressbook Provider
- How to setup LDAP Addressbook Provider